| Table of contents | Previous page | Next page |
Before you start using "UK's Kalender" you should take a look in the menu under "Extras/Options..." and choose the program settings that fit your needs. You'll then see the "Options" dialog where you can choose to start "UK's Kalender" with Windows, the default event file, display colors and so on.
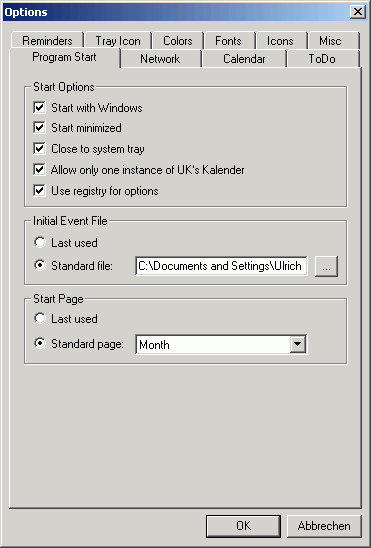
Here you can tell "UK's Kalender" what to do on program start. Normally, "UK's Kalender" always runs in the background so it can remind you of upcoming events. You can enable or disable this feature under "Start Options" with the checkbox "Start with Windows". If "UK's Kalender" should directly minimize to the system tray you must also choose the option "Start minimized".
In most cases it's recommended to allow only one instance of the program. Multiple instances of the program might overwrite each others changes to the database, as both will use the same file. If you are not sure what this is all about, simply leave this option checked.
Now an option for the forgetful: If "Close to system tray" is activated, closing the main window will not shut down "UK's Kalender" but minimize it to the system tray. Of course you can still exit the application by either using the menu entry "File / Exit" or via the context menu (right mouse button) of the symbol in the system tray.
Finally, you can determine, where to store the options. Usually the registry is used for storing program settings. If you deactivate this setting, "UK's Kalender" uses an ini file instead. It is stored under "Application Data/UK's Kalender" of the currently logged on user.
Figure 3.2.1: Tab "Program start"
In section "Initial event file" you can choose the event file to load right after program start. You can tell "UK's Kalender" to always load a default file or, if you're using multiple event files, to load the last file from the previous session.
Under "Start page" you can select your preferred data view. You can either choose to start with the last active view or to always use one of the five possible default views: "ToDo", "Week", "Fortnight", "Month" or "Year".
This page is for activation and configuration of the network feature. The network feature allows sharing a common event file between multiple users. The shared events run in parallel to your private events, so you can still enter events that are only visible for you. If one user adds, changes or deletes a shared event, all other calendars will synchronize to this change.
You can use the network feature with either a shared file on the intranet or a shared file on a FTP server. In case you put the shared file in a public folder on the intranet, you must enable the corresponding option and enter the path to the file in the text field right below. In a larger network this will probably be a folder on some kind of server, in a home network a network share on one of the workstations is sufficient. Put a copy of an empty event file into this folder and enter the complete path to this file under "Shared file". Please do not enter the path to your private event file here! This will not work and might corrupt your event database. It is also not possible to use a copy of an event file that already contains local events! Be careful when you enter the path. It'll work for your computer if you host the shared event file and you simply enter the normal path, e.g. "C:\Public\Calendar\shared.dat". The same setting will not work for all the other computers. All other computers will require the full UNC path, e.g. "\\MARCS_COMPUTER\Public\Calendar\shared.dat".
In case you are using the FTP option, you'll need to enter the FTP server address, your login and your password. The default port number 21 normally needn't be changed. In some cases (if you are behind a firewall) it might be necessary to activate the option "Passive connection". This connection mode must also be supported by your FTP-Server, then. Finally you have to enter the path to your shared event file relative to your user directory on the FTP server.
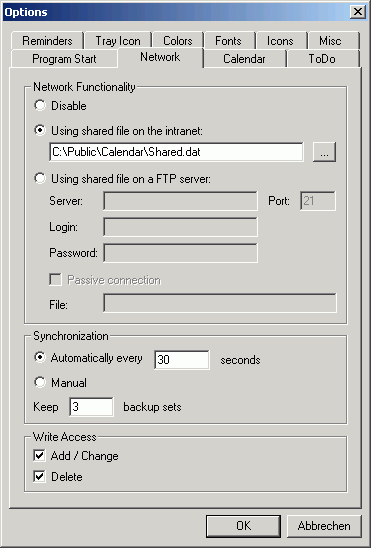
Figure 3.2.2: Tab "Network"
Synchronization of the local event file with the shared event file can be done either automatically in an user defined interval or manually. If you use a dialup connection for connecting to the server hosting the shared event file, you should disable automatic synchronization. This is also true if transfer time and volume matters. On the other hand, if you use the network functionality from within a local network, activating the automatic synchronization will normally be the better choice.
Each time the calendar synchronizes it's event file, it will create a backup copy of the shared event file on the server if the last backup is older then 20 hours. You can adjust the number of copies to keep with the last synchronization option.
You can also restrict your own access to the shared event file to read-only or modify-only by changing the "Write access" options. Be aware that this setting can be changed by yourself or anyone who has access to your account, so consider this option rather as a reminder than a rights management.
Here you can find some options for the calendar view.
In section "Week Start" you can choose if the week should begin on Sunday or on Monday. In European countries the week normally starts on Monday.
In the next section you can tell "UK's Kalender" to show week numbers in the table headers of the calendar view. The week number is calculated conform to either ISO-8601 (week start is always on Monday), US-standard (week start is always on Sunday) or an alternative method, where the chosen week start is used as reference day for counting.
The layout settings determine, whether to show successive week days side by side (horizontal) or one below the other (vertical). The week view additionally allows displaying all the days in one row with reduced column width. This way you can make best use of the available display space.
The tooltip options allow a selective deactivation of the event and header tooltips. This can be useful if you have lots of events with only little extra info in the "Notes" field of the events. If you have a large number of events per day, the tooltips might flicker, so that they are rather irritating than informative. In this case, you can first try to use the "Single" option for the event tooltips. This will result in one tooltip per event instead of one tooltip for all events of a day.
The "Page Navigation" options will activate the alternative page navigation using the mouse wheel and the PgUp/PgDown keys. If these options are enabled, the operating mode of these keys is switched from navigation between events to navigation between calendar pages.
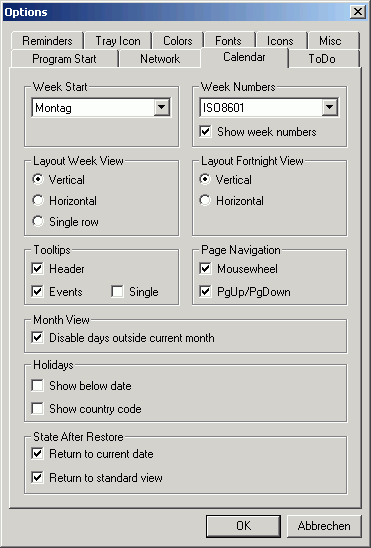
Figure 3.2.3: Tab "Calendar"
Under "Month view" you can choose to disable all dates outside the currently selected month. This option affects only the month view. Disabling the dates outside the selected month has the advantage, that it's impossible to erroneously enter events outside the desired month.
The holiday display can be configured with the next option. Per default, holidays are displayed right aligned next to the date of the event header field. Especially in the more space restricted views the holiday display is often truncated. To reserve more space for holidays, you can activate the option "Show below date". This way, the full column width of a day can be used for the holiday display. If you activate more than one holiday module, you can enable the country code display. The three letter country code will be displayed next to the holiday, then.
Finally you can make the calendar jump back to the default view and the current date if it is restored from the system tray.
Here you can set some options for the ToDo list.
The first option allows displaying grid lines in the ToDo list, so that it is easier to find corresponding list entries. The second option is for enabling / disabling the tooltip display for todo entries.
In section "Due ToDo's" you can choose how you'd like to be reminded of due todos. If you select "Mark ToDo tab" the "ToDo" tab is color marked if any todo enters the forewarn interval. Selecting "Mark calendar icon" will change the background of the tray icon to red if there are any due todos. As the tab marker is only visible in non-minimized operation, it makes sense to allow changing the tray icon.
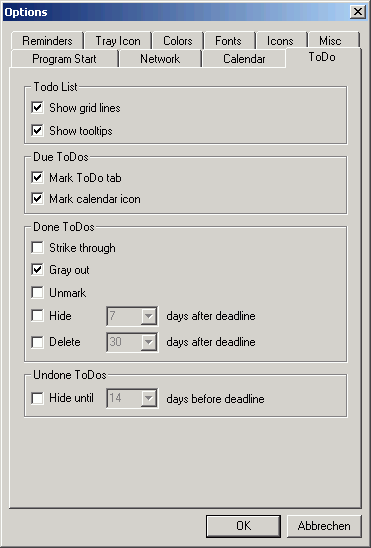
Figure 3.2.4: Tab "ToDo"
You can also choose how to handle finished todos. The first three options will change the appearance of done todos. If you'd rather like to hide finished todos, you can enable the option "Hide n days after deadline" and enter the number of days finished todos should stay in the ToDo list. With the option "Delete n days after deadline" you can tell "UK's Kalender" to even automatically delete finished todos after a certain number of days.
If you enter lots of todos in advance, it might be a good idea to also choose the option to hide unfinished todos until they are approaching their respective deadline.
This dialog offers options for the reminder display.
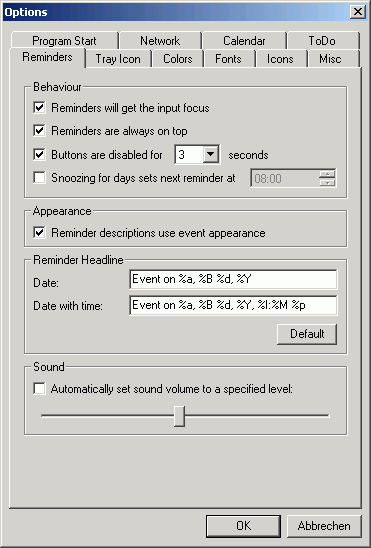
Figure 3.2.5: Tab "Reminders"
The reminder dialog usually comes up as the foreground window and cannot be put into the background. There are two options to change this behavior. If you don't want the reminder window to stay on top, you can make it behave just like a normal window by deactivating the option "Reminders are always on top". The option "Reminders will get the input focus" means, that the reminder will definitely become the foremost window and will always get the input focus, no matter what you are doing at the moment. This option might be useful if you have deactivated the option "Reminders are always on top" and the reminders do only appear on the task bar.
The option for deactivating the buttons of the reminder dialog for a short time will keep you from accidentally clicking a button while working with a different program.
Snoozing an event for n days will normally shift the next reminder n x 24 hours. If you e.g. snooze an event at 23:00 for one day, you'll be reminded at 23:00 the next day. If you don't like this default , you can tell "UK's Kalender" to remind you at a specified time, if you snooze an event for some days (or weeks).
If you choose to activate the option "Reminder descriptions use event appearance", the reminders will show up just like you've entered them into the calendar, including the text and background colors. The "hidden" attribute will of course not be adopted.
The first line of the reminder dialog shows the start date of the event. The format used for formatting this date can be customized in section "Reminder Headline". You can set different formats for start dates with and without time. The available variables are listed in chapter 3.12.1.
Using the Sound option, you can make the calendar play the reminder sounds always with a preset volume, regardless of the Windows sound volume and mute state. Simply activate the option "Automatically set sound volume to a specified level" and choose the desired reminder volume using the slider control below. When the reminder window is closed, the Windows sound settings will be reset to their previous state.
When the calendar is running, an icon is displayed in the system tray at the bottom of the screen, next to the clock. This icon is used to display the calendar and to show some information about the current status of the calendar, e.g. the icon turns red if there are due ToDo's. Using the tray icon options, and display of the tray icon can be modified.
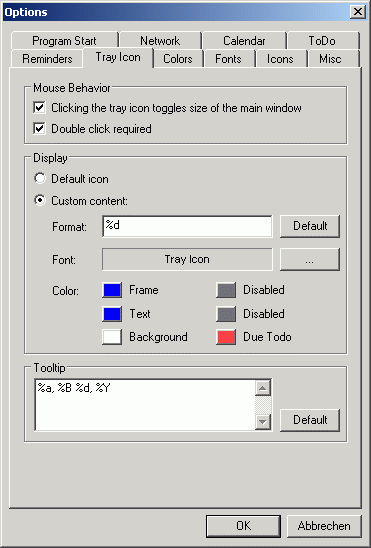
Figure 3.2.6: Tab "Tray Icon"
A handy feature is offered by the option "Clicking the tray icon toggles size of the main window". If this option is enabled, you can use the tray icon to restore from and to minimize the calendar into the system tray. Whether this is done via a single or a double mouse click is determined by the option "Double click required".
The tray icon can either display the default icon (blue clock on white background) or a custom content. Custom content can be created from the date variables described in chapter 3.12.1. As there is very little space to show some info, only short entries should be displayed, e.g. the current day of the month or the abbreviated weekday. If the custom view is activated, the color coded status info is still available, so the icon will be displayed normally with white background, with red background if there are due ToDo's, normally with blue text and with gray text if the alarms are disabled. These colors can also be adapted to your preferences with the color options of the custom content.
You can also specify a certain font for the tray icon to achieve best possible readability. Just click on the "..." button next to the font display and choose a suitable font.
If you stay for a while over the icon in the system tray, a tooltip will pop up. The contents of this tooltip can be configured in the section "Tooltip". Possible formatting options are again described in chapter 3.12.1. You can use the "Default" button to get back the original settings.
Here you can adapt the color scheme to your preference. In the calendar views the colors of the headers stand for a certain state of the date. In the default color scheme e.g. the current date is marked dark blue. By clicking the color button you can modify the default coloring. This way you can also adapt the colors of all week days.
Beside the headers it is also possible to completely change the color scheme of all event views, including background and grid colors. By default, the calendar will take your Windows color scheme. If you want the calendar to have a different color scheme without changing your Windows settings, deactivate the option "Use Windows color scheme" and adjust the window colors using the color buttons.
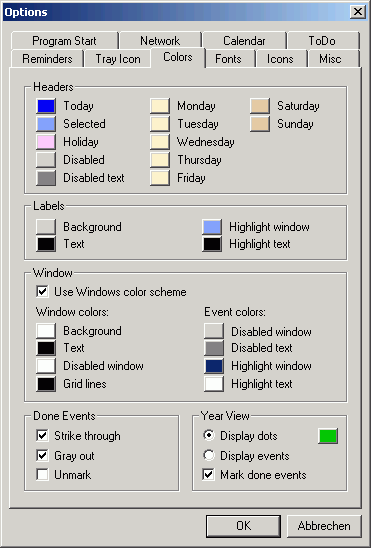
Figure 3.2.7: Tab "Colors"
How to show events after they are done can be configured under "Done Events". You can choose to show them stroke through and/or grayed out and additionally to unmark any color-marked event. This greatly enhances the clarity if you have lots of color marked events.
For the year view you have the choice between two different display modes. The "Display dots" option will display the events as dots with the dot size depending on the number of events for that date. If you choose "Display events", the events will be displayed with their respective color scheme, so that the year view resembles a miniature view of the normal event display. Additionally, you can choose whether you want to do display done events grayed out or not.
Most of the used fonts in the calendar can be changed. Simply use the "..." buttons to choose the desired font. The labels next to the buttons will reflect your choice.
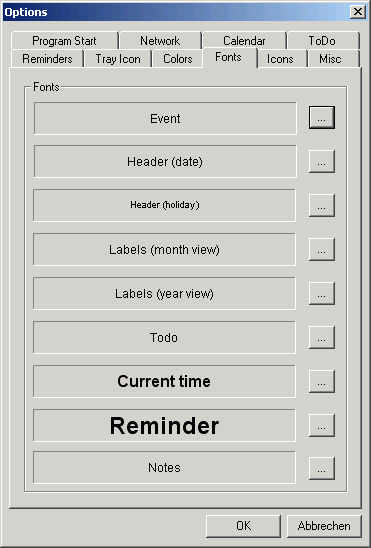
Figure 3.2.8: Tab "Fonts"
Certain event properties can be displayed in the normal event display using the icons selected in this configuration dialog. The following event properties are supported:
If the respective event has one or more of those properties, the chosen icon for this property will appear on the rightmost side of the event display. If you don't find an icon that fits your needs, you can easily extend the number of available icons by simply copying new icons into the "icons" subfolder of your calendar installation. Try to give the new files meaningful names, as these names will appear in the drop down box. The icons should hold at least a 32x32 pixel image.
![]()
Figure 3.2.9: Tab "Icons"
Some further configuration options can be found here.
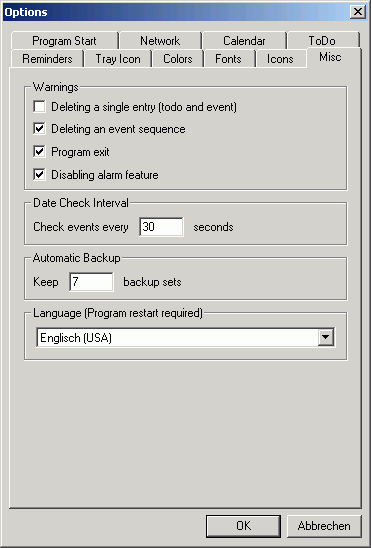
Figure 3.2.10: Tab "Misc"
In section "Warnings" you can select on which actions you'd like to be warned. Especially if you are new to this program it's a good idea to be warned on program exit, as you won't be warned upon upcoming events then.
Under "Date Check Interval" you can define how often "UK's Kalender" should check the database for due events. The default setting of 30 seconds is certainly precise enough and does not take too much computing time even on small computers.
Section "Automatic Backup" gives you control over the number of backup sets "UK's Kalender" will generate automatically. Each time the program is launched, it will try to make a backup of the current event file, if the last backup is more than 20 hours old. This way, you'll usually get one backup per day. With the default setting of seven backup sets, you'll have a one week history of your event file, which should be sufficient if there is ever the need for restoring your events. The backup sets are named as the event file but with the extension b00, b01, ... and are located in the same directory. Restoring a backup is done with "UK's Kalender" closed by deleting the corrupted event file and copying and renaming the latest intact backup file.
Finally you can select the language for the menus, dialog boxes etc. After a change, "UK's Kalender" needs to be restarted for the change to take effect.
| Table of contents | Previous page | Next page |