| Table of contents | Previous page | Next page |
The possible settings for a backup job consist of
The following chapters will discuss the possible options for configuring a backup job.
On the left side of the main window you can see a directory tree, showing all local drives of the type "Local Disk" and "Removable Disk". By clicking on the "+" sign in front of the drives and folders you can expand the tree to see the subfolders of the chosen branch.
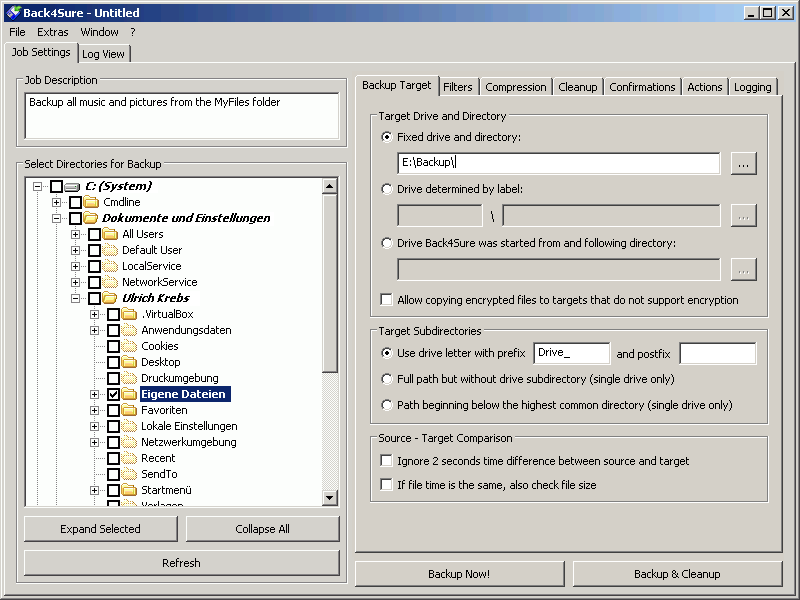
Figure 3.1: Selecting the backup source folders
The directory tree inside Back4Sure does not necessarily match the view you can see inside the Windows Explorer. This is due to the fact, that Back4Sure shows the real content of the drives, while the Windows-Explorer usually shows a filtered view. This may be confusing, as certain folders, e.g. "My Documents", are not where you may expect them. Nevertheless, all the files and folders are there. The folder "My Documents" e.g. is in fact located under "C:\Documents and Settings\<User Name>\My Documents".
Selecting the the source directories for backup is quite easy: If you want to backup the complete folder including all subfolders, simply put a checkmark in front of that folder. With this, all folders below the chosen folder will also receive a checkmark. This is also valid for subfolders that are added after creating the backup job. If you want to explicitly exclude certain subfolders from the backup, just remove the checkmark in front of the unwanted subfolder. Removing the checkmark will again affect all subfolders.
Even if all folders are closed you can easily see, if some subfolders are selected for backup. Each folder that contains at least one folder marked for backup is displayed in bold letters. This way you can easily find out which folders are included in a backup set.
If you choose a complete drive for backup, you should exclude certain system folders from backup. Under Windows XP these folders are "Recycler" (the recycle bin) and "System Volume Information". Especially the latter may not be copied even with administrator rights. If you don't exclude these folders from backup, your other files will still be backed up correctly, but you'll receive error notifications that some files could not be saved.
Of course, Back4Sure needs to know where to store the backup. Therefore it is essential to specify a suitable target directory. On the right side of main window you can see a tabbed dialog. Here you can set all options for a backup job. The first and most important allows the specification of the backup target.
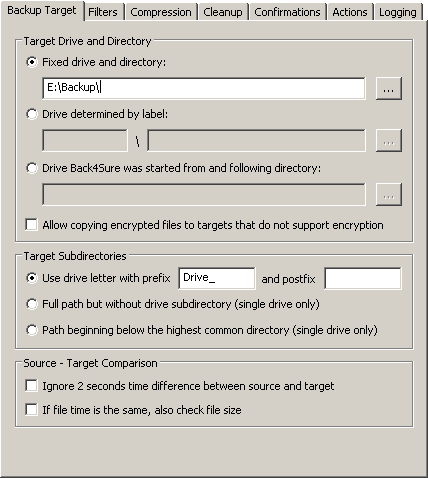
Figure 3.2: Specifying the target directory
In most cases, choosing a fixed drive and directory as target will be the right choice. A fixed drive is a drive which drive letter or UNC path does not change. Just activate the option "Fixed drive and directory" and click on the button with the three dots next to the edit field. A dialog pops up and allows to select a target drive and directory. Your choice will be entered into the edit field, then.
In fact Back4Sure has now all required input to perform the backup operation. After saving the job you can press the "Backup Now!" button to start backing up your data.. Still there are quite a few more options to tailor the backup process to your special requirements.
If you use an external disk via USB, FireWire or eSATA, it may happen that the disk receives different drive letters each time you connect it to your computer. In this case it is probably a better choice to select the second option "Drive determined by label" to specify the target drive. If you select this option, Back4Sure does not care about the assigned drive letter but searches for a disk with the specified disk label. For this function to work it is essential that the external drive has a unique name, e.g. "USB-Backup". You can easily change the drive label by opening "My Computer", selecting the drive and choosing "File / Rename" from the menu.
To select a drive with a certain label you can use the "..." button next to the edit field. In this case, Back4Sure automatically reads out the label of the selected drive and enters it into the edit field.
Finally you can also tell Back4Sure to use its own start drive as backup target by choosing the option "Drive, Back4Sure was started from and following directory". This way you can carry your backups together with Back4Sure on a removable media. Just plug the disk into the computer to backup and start Back4Sure right from that disk. You only need to specify a folder for the backup data if you use this option.
The option "Allow copying encrypted files to targets that do not support encryption" is useful, if you are using the encrypted file system (EFS) of Windows and still want to make a backup copy of your files to a drive that has no EFS, like a FAT32 formatted external hard drive. Normally, Back4Sure will refuse to copy EFS encrypted files to such a drive. If you enable this option, the files will be copied anyway. Be aware that the files on the external drive are not encrypted anymore!
As Back4Sure allows saving data from different source drives into on backup, each source drive will usually be stored into a different target subfolder. Back4Sure takes care about these subfolders and generates them automatically. With the default setting "Use drive letter with prefix and postfix", each subfolder will receive a name that contains the drive letter of the source drive. Additionally a prefix will be prepended and a postfix appended. By default, the prefix is "Drive_" while the postfix is empty. So data from source drive C: will be stored in a folder "Drive_C" on the target drive. If you want a different pre- or postfix or nothing at all, you may change it as required. Even if you leave the edit fields empty, still a subdirectory with the name of the source drive will be created in the target directory. If you don't want any additional drive subdirectory in the target, you may want to use one of the other two options for creating target directories.
The option "Full path but without drive directory" completely switches off the creation of drive specific subdirectories in the target directory. Still the complete paths of the source files are replicated in the target directory. This option may only be selected, if all source files originate from one single drive. If files from more than one drive are selected, the backup will not execute. Despite of this mechanism, this option is less safe than the option "Use drive letter with prefix", as it is still possible to run jobs with files from different drives into one target directory, possibly causing ambiguities. If one job e.g. backs up files from D:\Data and the other one from E:\Data, both saving into F:\Backup, the files from D:\Data and E:\Data will be mixed in the target directory. So please, use this option only if all backup jobs running into one target directory refer to one single source drive.
The last option "Path beginning below the highest common directory" will shorten the source path as much as possible, i.e. the common part of all source files will be discarded. If you plan to backup the "My Music" and the "My Pictures" folders from the the "My Documents" folder, only these two folders will be created in the target directory. This option is the most unsafe one with respect to possible ambiguities. It should only be chosen, if there is exactly one job saving into one target directory.
Attention! If you plan to use one of the both options without drive directory, please always create a backup subdirectory on the target drive and never backup your data directly to the root directory! Otherwise, during a cleanup run, the whole contents of the target drive (except the backup of course) may be deleted. In general, I'd advise against using one these two options, as the benefit usually is disproportionate to the possible risks.
The option for ignoring a 2 seconds time difference between source and target can usually stay deactivated. There are certain constellations, though, where this option can be helpful, e.g. if you save your backup files on a network drive. If you notice that some files are backed up again and again though you know they were not modified between backups, try enabling this option.
With some programs it might happen that the file contents are changed while the file date and time remains the same. This can be useful for e.g. photo editing software, because this way after editing the photo, the file date is still the shooting date. To allow detecting those changes, you can enable the option "If file time is the same, also check file size". Back4Sure will then also backup those files that have the same modification date but a different size.
A brief note about the backup target: The best place to store your files is a drive that is not on the same physical disk as the source data. Of course, this requires a second hard drive in you computer. This second disk can be installed inside your computer or externally connected via USB, FireWire or eSATA. The reason why I recommend a second disk is easy: A common reason for data loss is a physical drive failure. If the disk is broken, a backup on the same disk won't help you. If the backup is on a second disk, you can easily transfer all your data back to a new disk. The best choice for your backups is an external disk that is only connected to the computer for the backup process. This way you'll not only be protected against hardware failure but in most cases also against malware (viruses, trojans) that may want to corrupt your data. The most comfortable way with highest performance is using a second internal disk, though.
You may want to backup only certain file types, e.g. your text documents or your photos. Or it is the other way round: You want to save every file type but not videos, as these files consume too much space on the target drive. Back4Sure offers a sophisticated filtering mechanism to exactly specify the files you want to be included in or excluded from the backup.
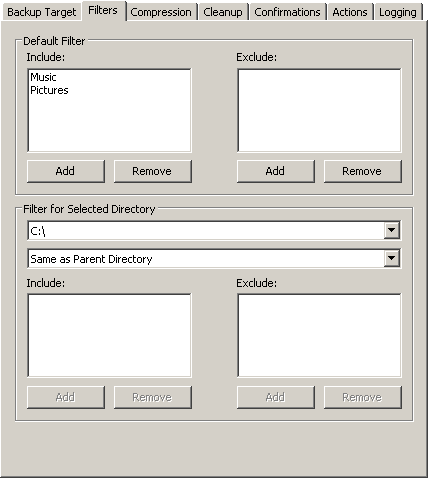
Figure 3.3: Filter settings
Each job has a default filter that is applied to all directories in case no other filter is defined. This filter is configured in the top half of the filter options window. By default, there is neither a filter for included nor excluded files. As a result, all files will be backed up and no file will be excluded. If you want to copy e.g. only your music files and pictures, you'll have to define one or more include filters. For this, press the button "Add" under the include filter list of the section "Default Filter". A window pops up then, allowing you to add previously defined filters to the include filter list.
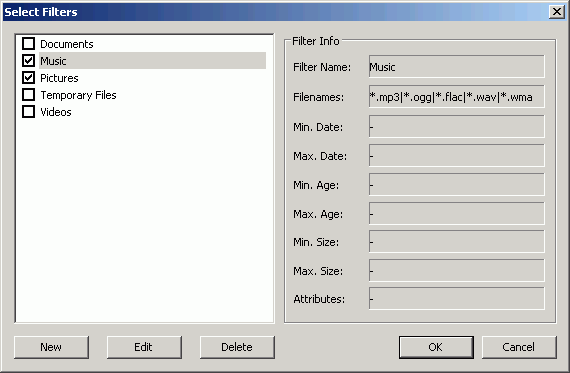
Figure 3.4: Selecting predefined filters
Back4Sure has a "built-in" set of default filters which you can modify or delete as required. Now select filters for the files you want to be included in the backup. Figure 3.4 shows a filter set to only include music and pictures. After selecting all required filters, close the window with the "OK" button. The names of the selected filters will appear in the include list of the filter options. If you didn't find a matching filter for your backup task, you may want to define your own filter. In the "Select Filters" window, press the "New" button. This will bring up the filter editor.
Figure 3.5: Creating a new filter
First you should give the filter a meaningful name, e.g. "Office documents" or "Photos from the last year". Now you can select and configure the filter options. Filtering works that way, that a file must match all selected filter options to pass the filter (AND relation).
The most common filter type is the filename filter. With this filter, you can select certain file types, e.g. jpg images or text files. To activate this filter, just put a checkmark in front of the option "Filenames". You can then define a set of filename patterns that a file must match to pass the filter. These patterns may consist of partial filenames and so-called wildcards. The wildcard "?" represents an arbitrary single character and the wildcard "*" represents any number of arbitrary characters. The pattern "index???.htm*" e.g. will accept the files "index001.htm", "index_ab.html" and "index1b7.htm00", but not the files "_index001.htm", "index0001.html" and "index123.htx". In most cases you'll probably only use the simple patterns of the kind "*.jpg", "*.doc" or "*.txt". With these kind of patterns you can easily select certain file types that are distinguished by their file extensions.
The input field for the filename patterns will accept multiple entries, that must be separated with the pipe symbol "|". Why the heck this strange symbol? Quite easy: This symbol may not appear in a filename, therefore no conflicts with a filename pattern can appear. On an US keyboard you can get this symbol by pressing Shift + Backslash (above the Return key).
The next two options will filter the files depending on their absolute modification date. The first option is for entering the the lower date limit (i.e. the oldest allowed date) and the second option is for the upper date limit (i.e. the newest allowed date). Possible usage of this option includes selecting files from within a certain date range for archiving them on CD or DVD.
Instead of using an absolute date you can also specify an age for the files to select with the next two options. The first option is for setting the minimum age and the second one for the maximum age. With this option you can e.g. easily select the altered files of the last week for backup on a special disk.
In some cases it might be also useful to filter the files by size, e.g. to exclude very large audio or video files from backup to save space on the backup media. The options "Minimum Size" and "Maximum Size" are just for this purpose.
Finally, you can also use file attributes as filter criterion. A possible application is the selective exclusion of hidden and system files, which often cannot be copied and therefore produce backup errors. All selected attributes will be ANDed, so if you select the attributes "System" and "Hidden", only hidden system files will pass the filter. If you want to filter out files that are either system or hidden files, you'll have to define two exclusion filters, one for system files and one for hidden files.
If you have finished editing the filter settings, close the edit window by pressing "OK". The just defined filter will appear under the given name in the filter list of the "Select Filters" window. Be aware, that this filter will only exist in this backup job! If you want to have this filter available in all future jobs, just add it to the default job. To do this, open Back4Sure without loading a special job file and enter the new filter as described above. Then choose "File / Save As Default" from the menu. From now on, the new filter will be available in all new backup jobs. Already existing jobs will not be affected by this action.
Usually, defining a default filter is sufficient for a backup job. This default filter will be applied to all selected directories when executing the backup job. In special cases it might be useful to apply a different filter for certain drives or directories, which is fully supported by Back4Sure. As it doesn't really improve the clarity of a backup job, this option should be used sparingly, though.
To modify the filter options for a certain drive or directory, select the corresponding item in the directory tree. It will show up in the section "Filter for Selected Directory", then.
Figure 3.6: Special filters for selected directories
By default, a subdirectory (and all its descendants) inherits the filter rules from its parent directory. Therefore "Same as Parent Directory" is displayed below the directory display. If you want to assign a different filter to the selected drive or directory you can choose one of the other options. If you choose "Default Filter for this Job", the default filter displayed in the upper half of the filter options dialog will be applied. This only makes sense if the parent directory already has a filter set that differs from the default filter and the chosen subdirectory should use the default filter again. With the option "Special Filter Defined Below" you can define a completely different filter set for the specified directory and all its subdirectories. Specifying the alternative filter set works exactly like for the default filter set and is done in the lower filter lists for include and exclude filters.
The special filter sets for certain directories are not as easy to inspect as the default filter. To alter or delete those special filters, select the corresponding directory from the drop down list in the section "Filter for Selected Directory". All directories with special filter settings are listed here. After selecting the wanted directory, editing or deleting filters is done as usual.
As already mentioned, using complex filter rules for certain subdirectories affects the clarity of the backup job and should be used with care. In most cases it's better to only use a default filter.
Back4Sure has the option to compress the files for archiving. This will save space on the backup media. The amount of saved space strongly depends on the files to backup. While newer office documents, jpg images or mp3 music are very hard to compress, HTML or text files offer some reasonable option for compression. Considering the currently available hard disk sizes, using compression doesn't make much sense in most cases.
There are still some applications for the compression option, especially if you use a flash drive as backup media. By using compression you avoid writing a host of possibly very small files to the flash drive. Such an action would dramatically decrease the write performance from some MB/s to a few kB/s. Using compression will in this case massively increase the backup speed.
The compression option is also very useful, if you have deeply nested folder structures and / or very long filenames, as they might occur if you save web pages from the internet, and if you plan to save the backup to an optical drive (CD-R, DVD-R). This media has strong restrictions concerning directory depth and the length of filenames. Therefore directly saving your backup files might not be possible. If you choose the compression option, all the directories and long filenames will be hidden inside the backup archive and will not conflict with the media restrictions anymore. So depending on the actual backup process you'll have to decide whether compression makes sense or not.

Figure 3.7: Compression settings
To activate compression for the current job, choose the option "Enable compression". No further settings are required, the defaults will usually give suitable results. Nevertheless, Back4Sure has some interesting options which are explained below.
The paremeter "Default filename" is used to determine the name for all archives that contain only files but no further subdirectories. This may happen depending on your settings for the "Directory level". If you disable the "Directory level" option, all archives will be named as denoted here.
The "Directory level" setting specifies the directory depth from which on all further subdirectories are packed into one archive. If you deactivate this option, all non-empty source directories are created in the target and all files in each directory are packed into an archive named "-Files-.zip". So each folder in the target directory holds exactly one archive. This setting is optimal if the backup target is on an internal hard disk and you still want to use the compression feature. If you enable the option "Directory level", all source directories from the specified directory depth on (counted from the root directory) will be packed into an archive. If e.g. the directory level is set to 1, the folder "My Documents" including all subfolders will be packed into the archive "Drive_C\Documents and Settings.zip". If you set the directory level to 2, the files will be stored into "Drive_C\Documents and Settings\<User>.zip". By setting the directory level, you'll also configure the number of archives that will be created in the backup process. In general, it is better for data safety to have the backup split into several files. If one large archive is corrupted, all included files may be lost. If there are several small archives, just the files in the corrupted archive are affected.
Depending on the directory structure of your backup source and the properties of your backup target, it might makes sense to adjust the "Directory level" parameter. Common values are between 1 and 5. Bigger values will finally lead to a behavior as if the "Directory level" option was disabled.
Besides the common Zip format you can also choose the 7Zip format for compression. This format has usually a better compression ratio, but requires more computation time. Finally it's rather a matter of taste which format you prefer, there are only differences if you want to use special features, like file name encryption or solid archives, which are only available if you use the 7Zip format. If you use compression for very long and nested directory structures, 7Zip might be also the better choice, as all 7Zip capable programs are able to read the resulting archives. In contrast, older compression programs or the Windows explorer might not have support for Zip archives containing very long directory structures and unicode file names.
By choosing a compression level you have further control over the amount of disk space required for the backup. You shouldn't overestimate the effect of higher compression levels, though. Especially the highest compression level will rather dramatically decrease backup performance than saving further disk space. Therefore, compression levels beyond "5 - Normal compression" are usually not recommended.
If the amount of space required for a backup is of great importance, e.g. if you want to put the backup on a DVD, you can enable the option "Create solid archives". This option is only available if you choose the 7Zip format. With this option enabled, significantly smaller archives are created, unfortunately at the expense of failure tolerance. In solid archives the loss of a few bytes inside the archive, due to faulty backup media, may cause greater damage than in normal archives, i.e. more files inside the archive may be affected by the data loss. If used for backups on reliable media with limited capacity, e.g. flash drives, the solid option is still a great way to create smaller archives to save some space.
The following options are all used for archive encryption. To encrypt the content of your backup archives, activate the option "Encrypt archive". If someone gets unauthorized access to your backup, he will not be able to extract files from the archives without knowing the correct password. Make sure, you choose a safe password, i.e. one that consists of 8 or more upper and lower case characters and perhaps some numbers and symbols.
You may also choose the encryption method. For Zip archives the available methods are ZipCrypto and AES-256, 7Zip archives are always encrypted using AES-256. AES-256 is generally considered as a safe method to encrypt files. So if your Zip program supports this encryption method, you should choose this one.
Despite content encryption, the file names are still accessible without knowing the password. As it is sometimes possible to draw conclusions just from the file names, it might be a good idea to hide them also. This option is only available if you choose 7Zip as archive format. File name encryption is also possible, if the backup archives already exist. Be aware that you cannot easily change the password for the backup archives after file name encryption. You'll first have to deactivate file name encryption using the old password and then activate it again using the new password. After changing the password it is also required to enable the option "Rebuild all archives" to ensure, all files within the backup are encrypted with the new password. If you forget to set this option after changing the password, all unchanged files of the backup archive will still be encrypted using the old password. The option for rebuilding all archives will automatically reset itself after a backup run.
After several backup runs, you'll probably have some orphaned files in the backup target, i.e. files that do not have a corresponding source file anymore. This happens, if you have chosen to delete or rename a source file. If you have renamed a complete source directory, there will be immediately a whole bunch of files with no corresponding source files. Those orphaned files still occupy space on the target drive and may cause confusion in case you want to copy some files back to the source drive. So it makes sense to do a cleanup run every now and then, to keep the target directory lean and clean. During this cleanup run, orphaned files will be deleted from the target directory, while no source file will ever be touched.
Attention! The cleanup settings should be chosen with care as there are several "cleanup levels" that will do a more or less thorough job. If misconfigured, you might end up with a cleanup run that deletes more files than desired. Especially if you have disabled the creation of drive subdirectories in the backup target, there is a potential risk of deleting other backups or even completely other directories from the target drive.
Depending on the chosen option for creating target directories (see chapter 3.2) the cleanup function works slightly different. This different behavior will be explained below.
Figure 3.8: Cleanup settings
The following explanations are only valid if you didn't disable the creation of drive subdirectories in the backup target. Disabling the drive subdirectories is potentially unsafe and should be used with caution! The differences to the normal behavior are explained chapter 3.5.2.
Figure 3.8 shows the most conservative setting, where only files may be deleted that for sure do not have any matching source file anymore. This setting can be left as is, if you don't make any bigger changes to the backup job. If you remove top level directories (first directory with a checkmark) from the backup, alter the filter settings or change the directory level for compression, many orphaned files will be left in the target directory with this cleanup setting. You may want to select more aggressive cleanup settings then.
The first option specifies the files to delete. If "Only cleanup files that do not exist in source path" is selected, Back4Sure will only delete files during a cleanup run that definitely have no corresponding source file anymore. It doesn't matter if the target file doesn't match the currently selected filter set or if the source file is included in the current backup. If a source file for a target file exists, the target file will be kept. Choose this option, if there is more than one backup job for a certain source directory, e.g. only images from the "My Documents" folder and only documents from the "My Documents" folder.
The alternative setting "Cleanup all files that do not match the current backup job" will remove all files in the target directory that per job definition do not belong into this backup. This will also delete files that may have a counterpart in the source directory but are due to filter rules or exclude options not part of the backup set. You can safely use this option, if this is the only backup job for a certain source directory, e.g. all files from the "My Documents" folder.
The second option determines the starting point for the search for orphaned target files. If you choose "Cleanup beginning from included directories" only orphaned files and directories below the top level include directory will be deleted. Files and folders of the same or higher level will not be touched. Choose this option, if there is more than one backup job for a certain drive, e.g. one job for "My Documents" and one for "Application Data" from drive C.
The setting "Cleanup beginning from backup target with drive directory" will start the search for orphaned files directly from the "Drive_X" folder, i.e. the topmost folder of the respective drive. This setting will also delete folders that were once top level include folders but were removed from the backup set. You may choose this option, if this backup job is the only job for a certain drive.
If a complete drive is removed from the backup set, there is no cleanup function that will automatically delete the "Drive_X" folder of the removed drive from the backup target. You'll have to manually delete the backup folder, then.
Finally there is also an option to enforce the removal of write protected files. In many cases the write protection originates from copying files from a CD or DVD to the hard disk. By default, Back4Sure will not delete write protected files during a cleanup run. By activating the option "Force removal of write protected files" you can allow Back4Sure to cleanup also write protected orphaned files .
If you have disabled the drive directory option, Back4Sure has to guess where the files in the backup target originated from. For this, the selected source directories of the current backup job are concatenated with the target subdirectories, i.e. some information from the backup job is required to obtain the source path from the target path of a backed up file. From this fact may arise problems if several backup jobs with a totally different file set, e.g. from different source drives, run into the same target directory. The bevavior of the cleanup function is therefore different if the usage of drive directories is disabled.
In general, the options for cleaning up the target directory will of course behave just as described in chapter 3.5.1, still there are some important points regarding the starting point of the search for orphaned files.
The option "Cleanup beginning from included directories" still starts just below the highest selected directory, but now this can be the main backup directory or even the root directory of the target drive, depending on the target options and the selected source directories. If you have selected e.g. the complete drive C: as backup source, the cleanup will now start directly in the main backup directory. If no backup subdirectory on the target drive is specified, the cleanup will start directly in the root directory of the target drive. This situation may also occur if you have selected a deeper source directory, e.g. the "My Documents" folder, and enabled the option "Path beginning below the highest common directory". In this case, everything above the "My Documents" folder, i.e. "C:\Documents and Settings\<User>, is discarded, so the starting point for a cleanup run is always the main backup directory. Consequentially, it's in most cases a good idea to create a subdirectory on the target drive just for holding the backup data, so no other files and directories may be affected from a cleanup run.
During the first test runs of a new backup job, it can be helpful to get an overview of the affected files prior to the actual copy and cleanup action. Back4Sure can show you a list of files to copied and to be deleted, so you can easily verify your backup and cleanup settings.
Figure 3.9: Options for the backup and cleanup confirmation
If you enable the option "Show a list of list of files to be backed up", Back4Sure will stop the backup right after comparing the source and the target directory and displays a confirmation dialog with all files that need to be copied.
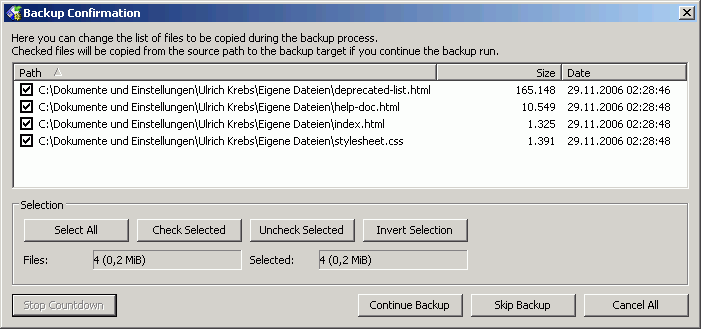
Figure 3.10: Dialog for confirming the backup
Within this dialog you can sort the list of files to be copied by name, size and last modification date. You can easily exclude individual files from the backup process by removing the checkmark. If you want to exclude all files of a certain type (e.g. *.jpg) or all files within a certain directory, right click on one of the files in question and choose the appropriate option from the context menu. Now choose "Check Selected" or "Uncheck Selected" to selectively include or exclude the selected files.
If you activate the option "Show the list even if there are no files to backup", the confirmation dialog will always appear, even if there are no files that need to be copied. The empty confirmation dialog can then be considered as a hint, that Back4Sure has dug through all your files and found out that actually no files need to be backed up.
If the setting "If the backup is not confirmed within x seconds" is deactivated, the confirmation dialog will block the backup run until manually confirmed. This is probably not wanted if you run an automatic backup. In this case, activate the mentioned setting and adjust the time Back4Sure should wait for a manual confirmation. You can also specify what to do after the specified time has elapsed without manual interception. If you choose the option "cancel the whole backup run", no further action is taken and the whole backup process will be aborted. If you choose "skip the backup", only the backup part will be skipped. If a cleanup is pending, it will still be performed. The final option "continue the backup operation" will automatically continue the backup process if the waiting time has elapsed. During the countdown for automatic continuation, the remaining time is displayed in the window title of the confirmation dialog. You can always stop the countdown and switch to the manual confirmation mode by clicking the "Stop Countdown" button.
The options for confirming a cleanup run have basically the same meaning as the options for confirming the backup operations.
Back4Sure can be configured to execute predefined actions before and after the backup process. This can be e.g. cleaning up temporary files before doing the backup or sending a mail with the log file after the backup. Actions are organized in two lists, one for all actions to execute before the backup one for all actions to execute after the backup. Back4Sure can also be told to wait until all actions are fully processed. This way, even long and complicated tasks can be accomplished without interfering with the actual backup job.
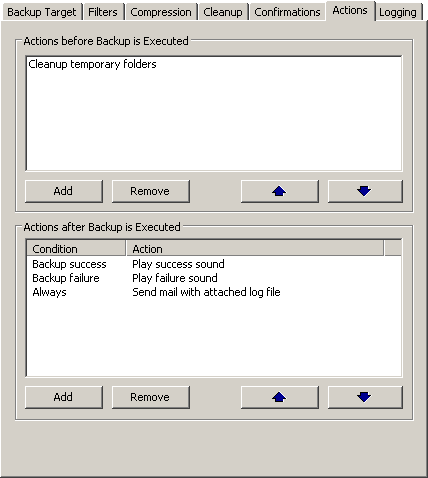
Figure 3.11: Defining actions before and after a backup run
The upper list holds all actions to execute before the backup, the lower list all actions to execute after backup. The entries of a list are processed from the top to the bottom. The order of the entries can be changed by selecting an entry and shifting it up or down using the arrow buttons. You can directly edit a task inside a list by double clicking an entry with the mouse. Keyboard operation is also possible: "Ins" adds a new action, "Del" removes the currently selected action and "Enter" opens the currently selected action for editing.
To enter a new action, click on the button "Add" inside the section "Actions before Backup is Executed". The dialog for selecting the new action will appear, then.
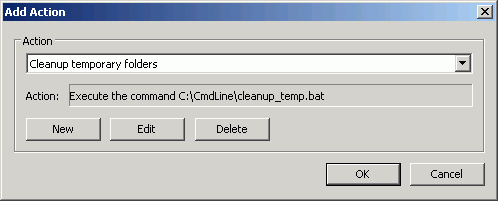
Figure 3.12: Adding a new action to execute before the backup run
Initially there are no actions defined, the dropdown box is empty. To add new actions, press the "New" button. There are three possible types of actions: Executing a command (e.g. running a program or script), playing a sound and sending a mail. The dialog for entering a new action has tabs for each action type. By selecting one of the tabs you define the action type. Be aware, that only the entries on the activated tab will be taken into account for the just created action.
Figure 3.13 shows the input for editing a command. A command is often just a program or script to execute. By executing a command nearly all possible tasks can be accomplished, only the given command determines what finally happens. If you are familiar with scripting languages like VBScript, you can also easily define your own commands to be executed here.
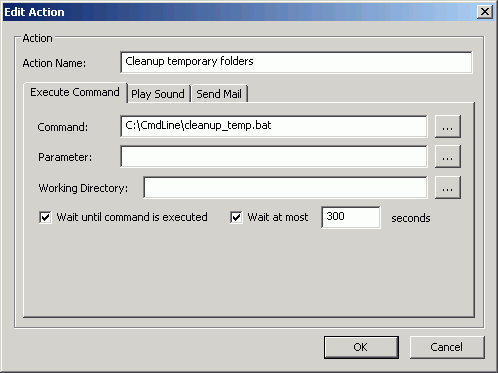
Figure 3.13: Creating an action for executing a user-defined command
The program or script to execute is entered into the "Command" field. You can also use the "..." button to directly select a program or script file. If the program requires parameters, e.g. a file name or command line switches, you can enter them in the "Parameter" field. Again you can use the "..." button to select a file as parameter. The last input field is for specifying a working directory for the program. Some programs require this info, if they work with relative paths. In most cases this field can be left empty, though.
If you call a program or script, it will require more or less time to accomplish the given task. Usually it doesn't make sense to continue with the backup operation, while the command is still executed. If you are e.g. cleaning up temporary folders first, this task should be finished before you start the actual backup process. To ensure that the command has finished execution, you can activate the option "Wait until command is executed". You can also activate the option "Wait at most X seconds" if you want the backup to continue, even if the command did not finish within a sufficient time interval, e.g. due to a failure condition. Without this option, Back4Sure will wait infinite for command completion.
After you have created the new action, you should give it a meaningful name. Later on, this name will be used in the dropdown box of figure 3.12 and in the lists of actions in figure 3.11.
Back4Sure allows playing WAV sounds without starting an external media player. If you want Back4Sure to make some noise before or after the backup, just choose "Play Sound".
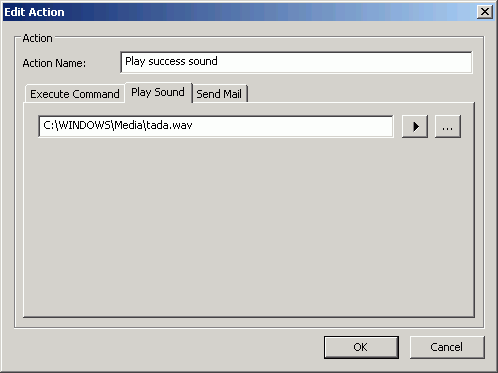
Figure 3.14: Creating an action for playing a sound
The input form has not much to explain. Just use the "..." button to select a WAV file. Use the "Play" symbol to listen to the just selected sound.
Finally you can also instruct Back4Sure to send you an email. As Back4Sure has an internal mail engine, no external program is required. The mail engine can connect to any SMTP server and handles common authentication methods.
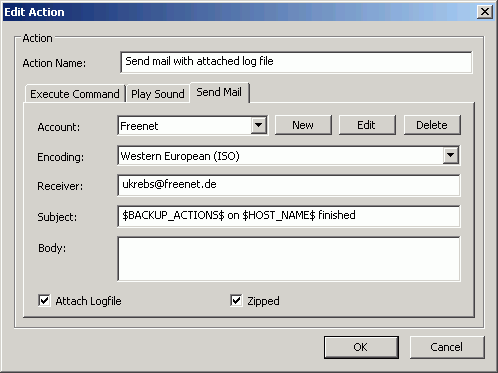
Figure 3.15: Creating an action for sending a mail
To send an email, you'll have to configure the SMTP server access first. Next to the dropdown box for choosing an account is a "New" button to specify a new mail account. If you press this button you'll see the input form for creating a new account.
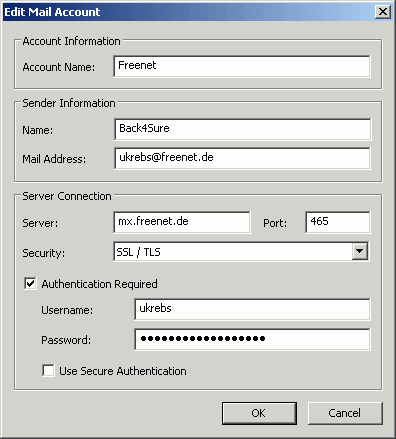
Figure 3.16: Creating a mail account
The first thing to do is to specify an account name. This is the name that will appear in the dropdown box in figure 3.15. You should enter the name of your mail provider or the mail address associated with this account. The next thing to fill in is the sender information. I suggest to use "Back4Sure" as sender name, as it is easy to recognize if you receive an automatically generated mail from your backup program. The sender address should be set to the regular mail address of this account. Some provider do not allow bogus addresses as sender, so the mails may not be sent if the sender address is incorrect.
Of course you'll also have to specify the address of the SMTP server to use. Just enter it in the "Server" field. The port number is usually determined by the selected connection security and can be left unchanged. Now choose the security setting for server connection. Possible choices are "None", "STARTTLS" and "SSL/TLS". Be aware that not all servers support all security options. In most cases, authentication is also required to get a server connection. Activate the option "Authentication Required" and enter your user name and password. If you also activate "Use Secure Authentication", your login details will always be transferred encrypted to the SMTP server. Again, not all servers do support secure authentication. You should always do a supervised test run before running automated backup jobs unattended.
After entering the new mail account, you can select it from the dropdown box shown in figure 3.15 and continue configuring the actual mail content. The default setting "Western European (ISO)" for the encoding will usually be correct, except you want to send mails in languages with special character sets. The rest should be quite clear: "Receiver" holds the mail address for sending the mail to, "Subject" holds the subject line and "Text" the mail body.
A pure static mail is probably not very informative (except that you'll see that the backup job was executed). Therefore, Back4Sure offers some dynamically generated information to be included in the mail contents. The first and most important option is to attach the current log file to the mail. For this, just activate the option "Attach Log File". As log files can be quite large, you can tell Back4Sure to zip the log file before sending it by activating the "Zipped" option, which will reduce the size of the log file to something around 50%. Attaching the current log file makes of course only sense, if the mail action is executed after the backup process.
A further option to create dynamic content is the usage of "place holders", i.e. certain key words which will be replaced by their respective contents at run time. Figure 3.15 shows such place holders in the subject line. The two key words enclosed by the dollar symbol $BACKUP_ACTIONS$ and $HOST_NAME$ will be replaced just before sending the mail perhaps by "Backup and Cleanup" and "OFFICE_COMPUTER". These key words will not only work when sending a mail but also in all other input fields of all possible actions. Section 3.9 will explain the available key words.
Adding actions to the lower list which holds the actions to execute after the backup works nearly the same way as with the upper list. As the backup is now already finished, actions can be bound to the backup result. This means, the actions will only be executed if the execution condition is met, e.g. if the backup was successful. Possible conditions are "Execute always", "Execute on backup success", "Execute on backup failure" and "Execute on following exit codes".
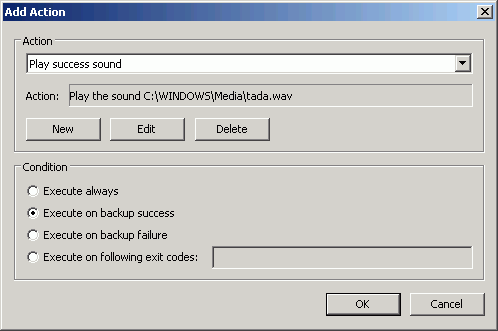
Figure 3.17: Adding a conditional action
You can choose the condition that must be met for the action to execute. If you choose "Execute on following exit codes", you can specify exactly which exit codes are required. You can also specify more than one value separated by commas or even a range of values by entering the start value, a minus sign and the end value, e.g. "1-5". The list of possible exit codes can be found in the table in chapter 5.2.1.
Back4Sure will create a log file for each execution of a backup job that holds information about events that occurred during backup. With the logging options you can specify the detail level of this information and the storage location for the log files. The filename of a log file is created from the name of the backup job and the execution date and time using the following scheme: jobname_yyyy_mm_dd_HH_MM_SS.log. Log files are plain unicode text files and may be opened with any unicode capable text editor, e.g. Notepad. For optimal functionality log files should be associated with with your favorite text editor. To create this association, double click on a log file from within Explorer and follow the instructions on the screen, if the log file doesn't already open in a text editor.
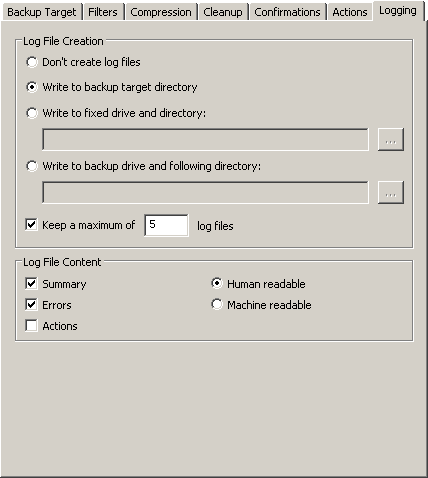
Figure 3.18: Settings for creating log files
In section "Log File Creation" you can specify if, where and how many log files are created. If you choose "Don't create log files", all logging functions are disabled. The default setting "Write to backup target directory" will create a log file each time the current job is executed and write it to the target directory specified in the "Backup Target" options. Alternatively, you can choose "Write to fixed drive and directory" to put the log files always into the same directory somewhere on your computer. The last option "Write to backup drive and following directory" will put the log files into the separate directory on the target drive.
Attention! If you have disabled the drive directory option in the target settings, you should not use the backup target directory for storing log files, as the log files may get deleted during a cleanup run. It's a better choice to store the log files in a separate directory on the target drive, then.
By default, the last five log files will be kept. If there are more than five log files, the oldest ones will be deleted. You may enter a different value for the number of log files to keep or even disable automatic deletion at all. To do so, just remove the check mark in front of "Keep a maximum of X log files".
You can specify the events to log in section "Log File Content". It is recommended to include at least the summary information into the log content, as this part holds the most essential information about the job execution. It is also useful to have the errors listed in the log file, as you can easily see which files weren't saved and also the reason for the failure. Sometimes it might be useful to keep a log of all actions that were performed during backup. If this option is enabled, each action, i.e. each copy or delete operation, will create a log file entry. Be aware that the resulting log file might grow very large, at least at the first backup run.
Log files may be created in two different formats: The normal human readable format or a format optimized for automated analysis. In the human readable format, most entries of the log file are easy to read and interpret. On the other hand, the machine readable format writes log files in a standard ini-format, that can be easily read by other programs, but are rather hard to read if opened in a text editor. If you do not plan to use an automated analysis of the log files, the human readable format is the better choice.
Hints on the interpretation of log files can be found in chapter 5.2.
Back4Sure allows the usage of key words in some input fields, e.g. in the "Target Drive and Directory" fields or in all fields describing an action to execute before or after a backup. The key words in the input fields will be replaced by their actual content at run time. This way, the behavior of a backup can be changed depending on the current conditions of the running backup job. You can e.g. dynamically create the subject of a mail that is sent after a backup run or you can backup your files to different target directories, depending on the current day of the week.
Especially if you use key words within the target definition, you should take care that the resulting backup process matches your expectations. If you include the backup starting time into the target definition, every backup will create a separate directory and always a full backup is performed. If you include just the day of the week into the target definition of a daily backup, only seven directories will be created and the eighth backup will be incremental again.
For the storage location of the log files you should also consider that not all key words may be translated without actually running a job. If you configure Back4Sure to save the log files into the target directory, but the target definition contains the start time of the backup job, the log files will not appear in the log view, as the target directory cannot be determined anymore. In this case, it is more appropriate to save the log files in a separate fixed directory on the target drive.
Following key words are understood by Back4Sure:
| Key Word | Description |
|---|---|
| $APP_PATH$ | Directory from which Back4Sure was started |
| $APP_DRIVE$ | Drive from which Back4Sure was started |
| $JOB_NAME$ | Name of the currently loaded job |
| $JOB_DESCRIPTION$ | Description of the currently loaded job |
| $HOST_NAME$ | Name of the host computer Back4Sure is running on |
| $LOGFILE_PATH$ | Full path of the log file |
| $BACKUP_STARTTIME$ | Starting time of the backup in the format "Year-Month-Day, Hour-Minute-Second". A different formatting is possible (see below) |
| $BACKUP_ENDTIME$ | Ending time of the backup in the format "Year-Month-Day, Hour-Minute-Second". A different formatting is possible (see below) |
| $BACKUP_DURATION$ | Duration of the backup in the format "Hours-Minutes-Seconds" |
| $BACKUP_ACTIONS$ | Backup actions, either "Backup" or "Backup and cleanup" |
| $BACKUP_RESULT$ | Numerical return value of the backup run (0 if there was no error) |
| $BACKUP_TEXTRESULT$ | Return value of the backup run as text message |
When using the date related key words, you can specify a different time format by entering a formatting string right after ...TIME and before the closing dollar symbol. The formatting string is composed from the following variables:
| Variable | Description | Example (21.08.2010, 15:36:38) |
|---|---|---|
| %y | Year (two digits) | 10 |
| %Y | Year (four digits) | 2010 |
| %m | Month of the year | 08 |
| %b | Short name of the month | Aug |
| %B | Full name of the month | August |
| %d | Day of the month | 21 |
| %j | Day of the year | 233 |
| %W | Week number | 33 |
| %a | Short weekday | Sa |
| %A | Full weekday | Saturday |
| %H | Hour (24 hour format) | 15 |
| %I | Hour (12 hour format) | 3 |
| %p | AM/PM display | PM |
| %M | Minutes | 36 |
| %S | Seconds | 38 |
If you want to include for example only the time part of the backup ending time, you can specify the new formatting by entering $BACKUP_ENDTIME%H:%M:%S$.
All numeric date values will be displayed with their respective maximum number of digits, filled up with leading zeros if necessary. So in January the variable "%m" will be translated to "01". If no leading zeros are required or wanted, you can switch them off by inserting a "#" right after the percent sign. The output "Saturday, 15.8.2010, 15:36" from the example in the table above can be achieved with the formatting string: %A, %#d.%#m.%Y, %H:%M
| Table of contents | Previous page | Next page |