| Table of contents | Previous page | Next page |
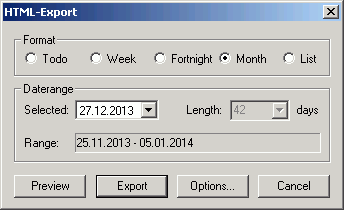
For exporting your events or todos to HTML format, choose "File / Export / HTML..." from the menu. The generated HTML document can be viewed and also printed out with a web browser (e.g. Internet Explorer, Netscape Navigator, Mozilla, Opera). As "UK's Kalender" does not have a printing option on it's own, this is also the only way to print out events and todos.
When exporting, all activated filter options will be applied. Only those events that appear on the calendar view will be exported. If you want to create a birthday calendar, simply activate the category filter for the category "Birthday" before exporting the document (if you have created such a category). The created HTML document will contain only birthdays, then.

Figure 3.14.1: HTML export
In section "Format" you can select which view you want to be exported. The default is always the current view, where the year view is replaced by a list view. If you choose one of the default views "Week", "Fortnight" or "Month", the amount of days is determined automatically and only a central date can be chosen. The corresponding view is generated around the chosen start date, the resulting date range is displayed under "Range".
If you choose one of the views "ToDo" or "List" instead, you can select the exact start date and the number of days.
Each view has an own template that is located in the "templates" folder of your Kalender installation. These templates can contain certain formatting information like background colors, images, info on the date range and so on. To customize the templates, some elementary HTML knowledge is required. The predefined templates are optimized for printing and normally don't need to be changed.
After configuring the HTML export you can select the "Preview" button to examine the generated HTML document. For the preview function to work, a recent web browser needs to be installed on your system. If the preview does not pop up, looks weird or is unreadable, it might be necessary to update your web browser. Sometimes it might be sufficient to change some output options available by pressing the "Options..." button, though.
Printing an event view can be done right from the preview, there is no need for explicitly exporting the document. If you want the HTML document for any other reason, you can save it to disk permanently by selecting the "Export" button. This will bring up the "Save as" dialog from which you can save the document.
To change certain aspects of the generated document you can choose the "Options..." button. These options are also available from the menu under "Extras / Export Settings / HTML...". The following chapter will explain the available formatting options.
This dialog determines the general appearance of the generated HTML document. As the HTML export is primarily intended for printing, it is a good idea to choose settings for optimal readability on the printing media. On the other hand it is also possible to choose settings that make the HTML document look nearly like the screen view.
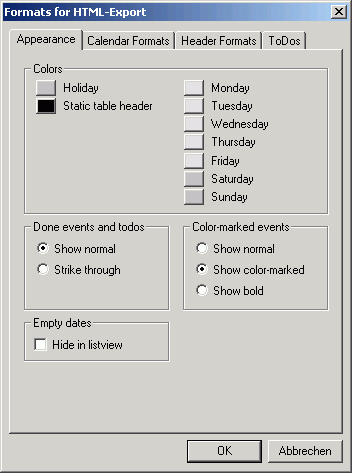
Figure 3.14.2: Tab "Appearance"
Like in the options for the calendar views you can choose a color scheme for the table headers of the HTML output in section "Colors".
Under "Done events and todos" you can choose how to handle done events. The default screen option (grayed out and stroke through) is not available, as it is very hard to read if printed. For marking done events you can still choose stroke through. To display done events just like undone is also possible. If you want to exclude done events from export, you should activate the state filter and deactivate the state "Done" before exporting.
Color marked events (field color or text color) can be configured for HTML export in section "Color marked events". You can choose to use the same coloring scheme than in the calendar views (" Show color marked"), to remove all coloring ("Show normal") or to use bold letters instead of colors ("Show bold").
Finally, in section "Empty dates", you can tell "UK's Kalender" whether to show or to hide dates with no events in the HTML list view.
Just like with the dialog for the internal formats (see chapter 3.13.4), you can specify how to display the events of the four calendar views for HTML export.
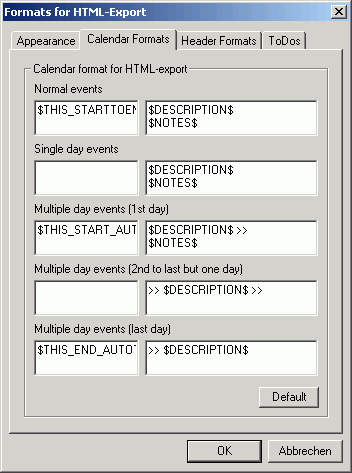
Figure 3.14.3: Tab "Calendar Formats"
Distinct from the internal formats, time formatting is separated from description formatting. The smaller fields on the left are for time formatting, the bigger fields on the right contain the description formatting.
The formatting options are exactly the same as for the normal calendar views, so please refer to chapter 3.12 for a closer description.
The button "Default" will restore all original settings.
The headers of the event fields are also configurable. The available formats are listed at the bottom of the dialog. Returning to the default values can be done by pressing the "Default" button.
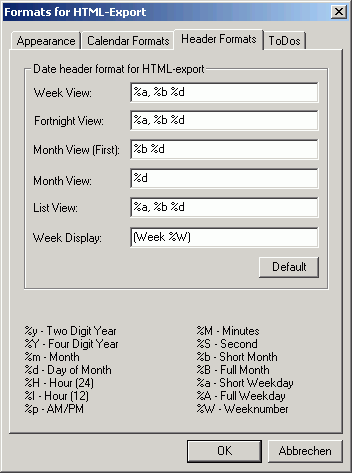
Figure 3.14.4: Tab "Header Formats"
Todos are always exported in list format. There are less possibilities for configuring the export.
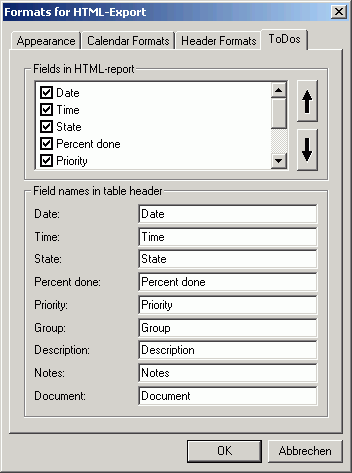
Figure 3.14.5: Tab "ToDos"
Under "Fields in HTML report" you can select which fields to export and also their order. To select a field for export, put a check mark before the corresponding entry by clicking the box preceding the entry. You can change the field order by selecting an entry and moving it up or down with the arrows on the right.
You can also choose the field names of the entries. These names will appear as table header of the HTML document. Simply enter the preferred names in section "Field names in table header".
| Table of contents | Previous page | Next page |